It’s that time of year—an old map goes out, and a new one comes in. The map rotating out will be Coruscant Back Alleys. To replace it, and to keep the map rotation balanced, we focused on adding a more melee-friendly map. At the same time, we also aimed to add a map with a few new elements to make each new game of Imperial Assault more unique and exciting.
PLEASE NOTE, especially for those skimming this article: The map missions have been altered slightly for official IACP play.
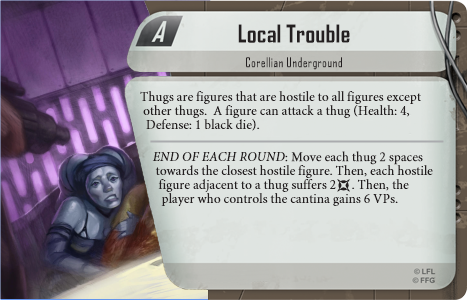
Mission A: Local Trouble, should read, in the first sentence: “Thugs are figures that are hostile to all figures except other thugs.” Other phrases in the mission have been reordered and edited for clarity.
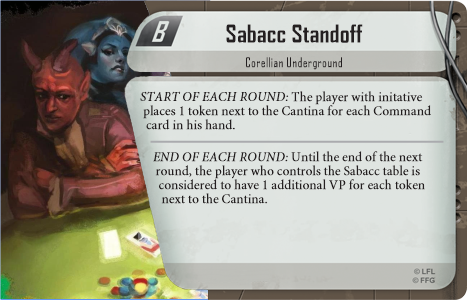
Mission B: Sabacc Standoff, should read, in the first sentence: “The player with initiative places 1 token next to the cantina for each Command card in his hand.”
The Vassal module version 12.10.2.3 has been updated with these new missions. Find it on the Vassal module website or pinned in the IACP Discord.
The new map rotating in will be Corellian Underground, from the Han Solo Ally pack. This map will be new to the competitive skirmish cycle. This map uses tiles from the Core gamebox. Let’s take a closer look at this map.
General Features
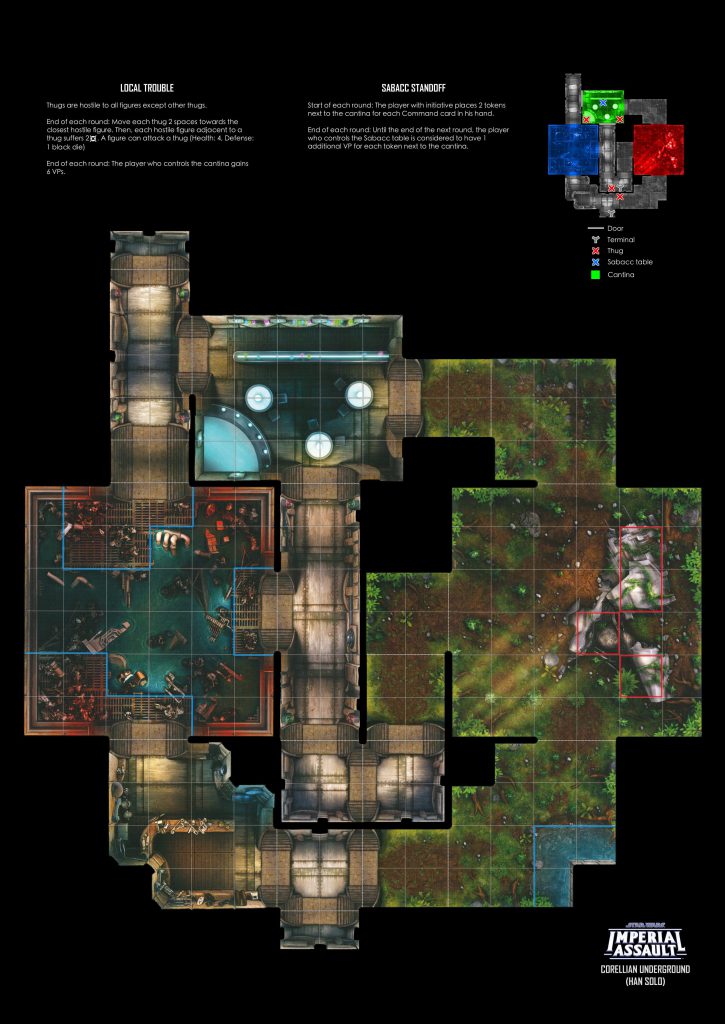
One immediate observation is the unusual terminal setup. While there are still two terminals on the map, they are both in a central location, rather than one designated for each side. The terminal in the central corridor is accessible within 3 spaces from each deployment zone, although doing so will leave the terminal sitter exposed. Yet, a specific terminal sitter may not be needed here, since it is likely that attackers will end up adjacent to the terminal one way or another. Massive figures may also benefit from the ability to push other figures off of the central terminal towards the end of a round. The terminal in the bottom corridor is accessible within 4 spaces from each deployment zone, but again will leave the terminal sitter exposed. Whether or not to contest the bottom of the map, and navigating around the terminal in the center, will be key issues on this map. This terminal design, along with the more fast-paced nature of games on this map, will decrease the amount of games that result in both players waiting to draw key command cards, and will advantage players who strike early before the opponent might have drawn key command cards. Still, abilities like Channel the Force, Heroic Effort, and other card-draw characters and abilities will provide their player with a command card advantage, if not in amount, at least in selection.
Another immediate observation is the proximity of the deployment zones. Indeed, attacks can be made into the opponent’s deployment zone from two or three spaces away from the friendly deployment zone. Still, this is not the entirety of the deployment zone, so figures can start in relative safety in the lower half of their deployment zone. The blue player should be wary of opening the central door, however, as attacks can be made down the hallway from the top right side of the map, near the red deployment zone. However, it should be noted that many of these sight lines can be blocked by strategic placement of chump-blocking figures such as C-3PO or an Imperial Officer. Indeed, 2×1 large figures like Dewbacks and Tauntauns will also excel at this role. This layout of deployment zones leads to natural tensions between how far a figure is willing to expose to strike into the opponent’s back line, because while the attack can be made easily, making it back to safety will be difficult. Additionally, melee figures will want to start close to the front and center of the deployment zone, and the opponent can choose to attempt to punish this, but the melee figures will not have a hard time advancing and striking back in short order.


Another element to note is that each deployment zone is quite large and has 3 exits. Where figures start will greatly change how this map plays out. A ranged list may choose to contest the top and bottom flanks while ignoring the center, whereas a melee list may choose to only go through the center. A figure that double moves can cross nearly the whole map, so rapid repositioning is possible. Still, given the close-quarters nature of the map, action economy will be king. Another element of deployment is relevant here—the player with initiative deploys first. This means that the second player has the option of seeing how their opponent has deployed their figures and can deploy as to engage or disengage. Opponent didn’t leave anyone in range of the bottom terminal? An officer may want to sneak down. This will keep the player with initiative “honest” to some extent, as it would be foolhardy to leave open an entire section of the map.
A brief note about deployment zones: while they are mostly symmetric about the center and the bottom, there are two key differences. The first is the difficult terrain in the Blue zone and the blocking terrain in the Red zone. The difficult terrain makes repositioning figures more difficult after a bad deployment, and makes efficient pushing with figures like Hera, Bodhi, and Cassian more difficult. If possible, figures should start adjacent to a normal terrain space for maximum efficiency. The blocking terrain in the Red zone limits the line of sight of attackers attempting to snipe across the southern end of the map, but how relevant this is will depend on the matchup. In this department, Red has a slight advantage.
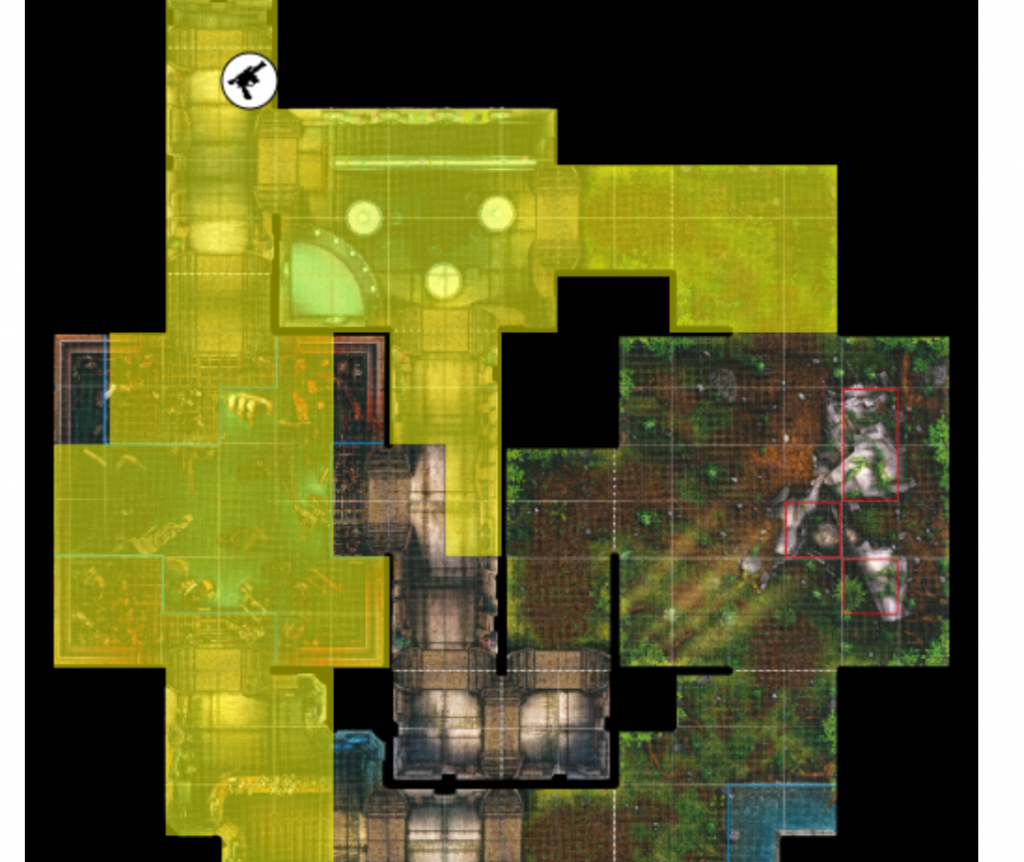
The main asymmetry arises from the northern section of the map. Blue starts close to two doors that can easily be opened from Round 1 with minimal risk. The left door opens up a sightline that allows figures to see the entire top corridor and easily retreat back to safety either upwards to the very top left or downwards to the deployment zone. The center door allows very quick access to the cantina, but opens up a lot of sightlines for the Red player. On the other hand, Red has basically only one way to enter the cantina, but as a result does not have to open a door to do so. A figure with Speed 5 or a push from a support figure may be able to forcibly open the center door, but whether this is advisable remains to be seen. Melee figures will probably prefer this approach, but ranged figures may prefer the greatly increased safety from the Blue side. The choice of deployment zone, and subsequent choice of deployment spaces inside said zones, will vary from matchup to matchup, and hopefully this will provide variety, even if the same list is played multiple times on this map.
Mission Objectives
Please note, as mentioned at the top of the article: to ensure that this map is balanced for competitive play, the IACP Steering Committee has decided to very slightly alter the mission rules for both sides. Corellian Underground was a map that was released very early on in Imperial Assault’s life cycle, and as such, some wording clarification needs to be added, and the mission objectives should be comparable to other maps in terms of possible VPs earned per round or at once. We strongly believe this changes will help make this map a competitive one. Updated skirmish mission cards will be available for printing shortly.
Side A: “Local Trouble” bears some resemblance to the gangsters side of Coruscant Back Alleys. Note that thugs are actually hostile figures on this map (as clarified by the update to the mission rules text), so they can be the target of basically any ability in the game. Notably, thugs are less tanky than gangsters, as 4 Health and 1 black die can often be defeated by an unfocused attack, or an attack from a strong support figure like Saska or Aphra. Thugs also do not respawn, and the map only starts with 4 of them (red X). Conversely, no VP are rewarded for killing them, so often they are left alive, and there is a bit of a minigame to try to position such that they will punish opponent’s figures rather than friendly ones.
At the end of each round, thugs will move 2 spaces to the closest hostile figure. Initiative order is important here—if there are multiple figures equidistant from the thug, then the player with initiative would decide which direction the thug ends up moving. Indeed, since there are many spaces that could be equally close or adjacent to a figure, the player with initiative has significant control over the positioning of the thugs, and can use them as line-of-sight blockers in a pinch as well. Notably, thugs only damage figures adjacent to them, and only deal 2 damage. If this becomes too much of an annoyance, they are easily removed.
The final, albeit most important part of Side A, is that control of the cantina is worth 6 VPs. This is as much as the Barracks on Endor, and definitely not worth conceding if at all possible. While no spaces are totally safe, some are safer than others, and a convenient space is shown below. However, it may not be necessary for a player’s figures to be inside the cantina in order to contest it. Note carefully the rules for control (from the Consolidated RRG: A player Controls a tile if there is at least one friendly figure in any space of the tile and no hostile figures in any spaces of the tile. – If friendly and hostile figures are on the same tile, no one Controls the tile.)
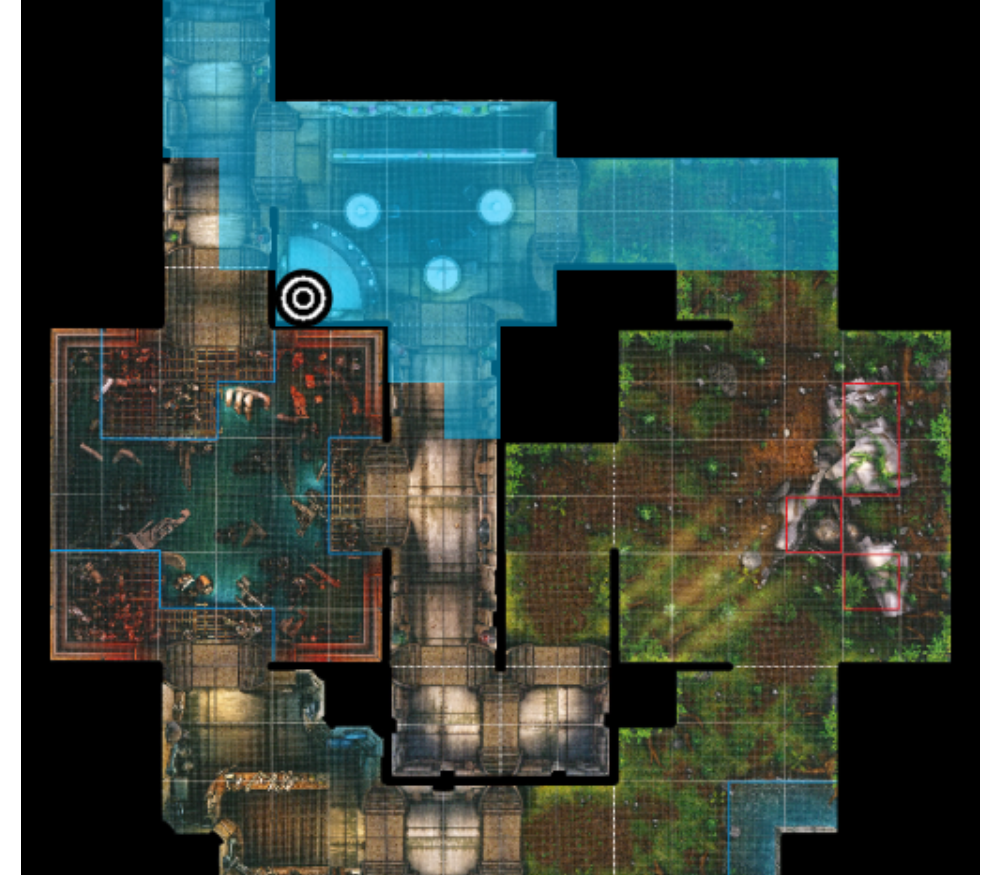
Since thugs are hostile figures, as long as at least one thug is inside the Cantina (and, at the beginning of the game, two thugs are), no player can control the Cantina. Furthermore, since every space in the cantina can be reached by at least one thug moving two spaces, it will be necessary to remove thugs to score these points. However, note that the thugs move first, before control is assessed, so it is possible that they may be baited out of the cantina.
This brings up another important point, which is that control of terminals is assessed at the card draw stage, which happens before End of Round effects. Thus, a player wishing to control the central terminal at the end of Round 1 on this side of the map must have a way of either pushing a thug away from the terminal, or defeating it outright. Overall, the thugs are but pawns in the larger game, but managing them effectively can lead to the difference between victory and defeat.
Side B: “Sabacc Standoff” is somewhat analogous to the Bespin Tibanna Facility mission. Note that there are no thugs on this side of the map, so terminal control and Sabbac table control will be easier to accomplish, and slightly more difficult to contest. Importantly, the amount of VPs that controlling the Sabacc table is worth is additive, over the course of several rounds. Each round, including the first one, tokens are added to the table, but they are never removed. The amount of tokens added is determined at the start of the round as 1x the number of cards in the player with initiative’s hand. This is notably a change from 2x the number of cards as in the FFG mission rules, which we have determined made too many objective VP available by the end of Round 3. This will be 3 to start with, and likely will mean that the objective is worth ~9-12 points by the end of Round 3, and continually increasing from there.
Control, however, is assessed once at the end of each round, and applies for the next round. Note that even if the controlling figures moves off during the next round, the player still controls the point until the next End of Round phase. These points are temporary points, and are lost (at the end of the Round) if control switches. Please be careful in tracking these points, and take the time to evaluate the end of round and start of round phases separately. We do recommend (even with virtual play) using tokens to clarify how much the table is worth since it changes over time.
It is obvious that this can lead to very large VP swings in the space of one round. There are several strategies one might employ to deal with the effects of the table. A player may choose to rapidly use Command cards, to limit the growth of the VP value of the table. However, the opponent also has a say, at least every other round. However, the most surefire way to deny the points will be to contest the Sabacc table, although doing so necessarily leaves figures exposed. Melee figures and queen pieces will enjoy this side of the map, as it will force an engagement in the middle of the map. Be cautious of massive figures and figures that can push other figures off of the objective, to sneak control at the end of a critical round for a large VP windfall.
Overall, we hope that Corellian Underground will be a map that leads to dynamic and aggressive gameplay that balances the flavor of the other two maps currently in rotation. We are excited to see what lists take prominence on this map and will be watching to see how contested terminals shake up the meta. As always, feel free to share your feedback and experiences of the map in the IACP Discord, linked at the top of this website.
–IACP Steering Committee
NB: Images used in this article were generated using the IA-LOS tool (available at https://nick-hansen.github.io/ia-los/), and we encourage you to use that tool to explore the map further! Give Nick a follow or, if this tool has helped you a lot, contribute at the link in the top right corner of the application.

