I was hoping to get a video analyzing the new map made before the tournament at Adepticon this year, but difficulties with capturing footage from Tabletop Simulator combined with feeling like I needed more first and second-hand experience on the map means that I’ve now finished my script but won’t have time to create a full video, so instead I’m turning this into an article! This is the knowledge I’ve accumulated after both playing lots of games and spectating lots of late-night Vassal games on this map over the last 2 weeks. Enjoy.
Intro
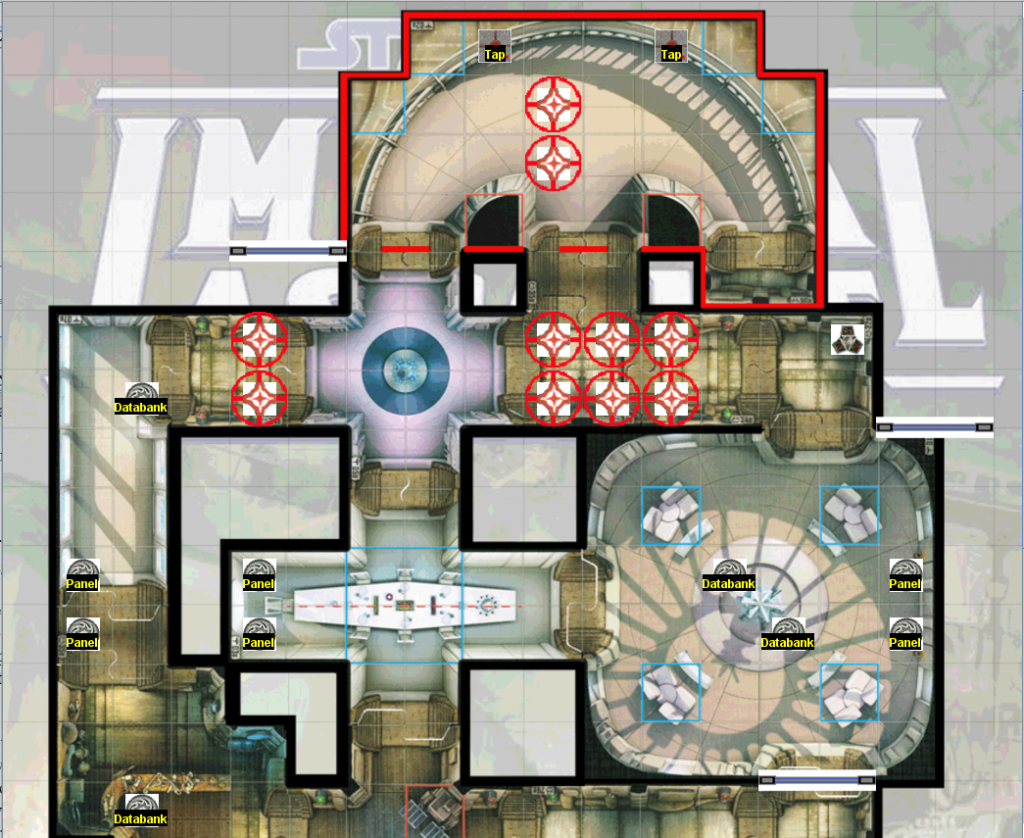
Welcome to the newest IACP tournament map, ISB Training Grounds.
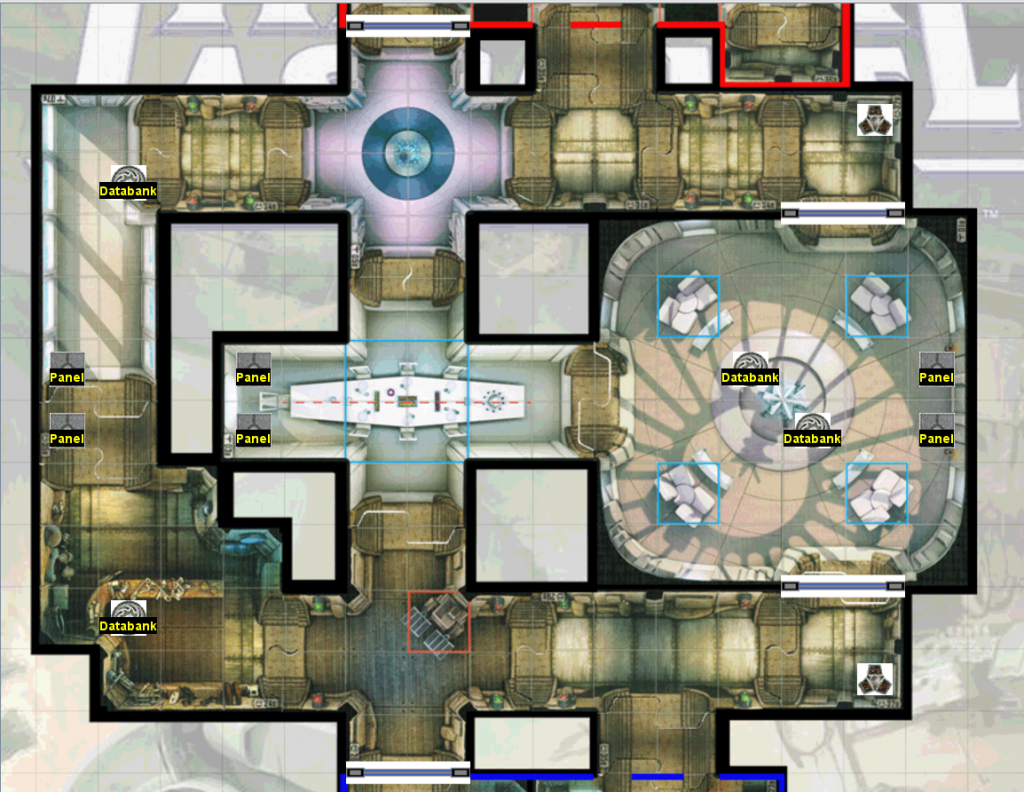
ISB Training Grounds has a seemingly straightforward design, with long straight, perpendicular hallways that intersect in the middle. Players face a choice between 3 different paths, with the long straight hallway in the middle that is easy to draw line of sight through but difficult to move through due to impassable and difficult terrain, the large and open penthouse tile on the right side which connects the terminals of both players as well as the middle hallway, and finally an elbow shaped hallway that is isolated from the other two paths.
This map offers ranged attackers nearly unparalleled sight lanes for which to threaten enemy positions and objectives should the opponent decide to risk leaving the safety of the main corridor outside of their deployment zone.
Regardless of your list’s primary attack type, your success on this map will often hinge on which pathway you choose to commit your forces to controlling, and how well you can use the end of round initiative swing to create an opening and force an advantage.
Information:
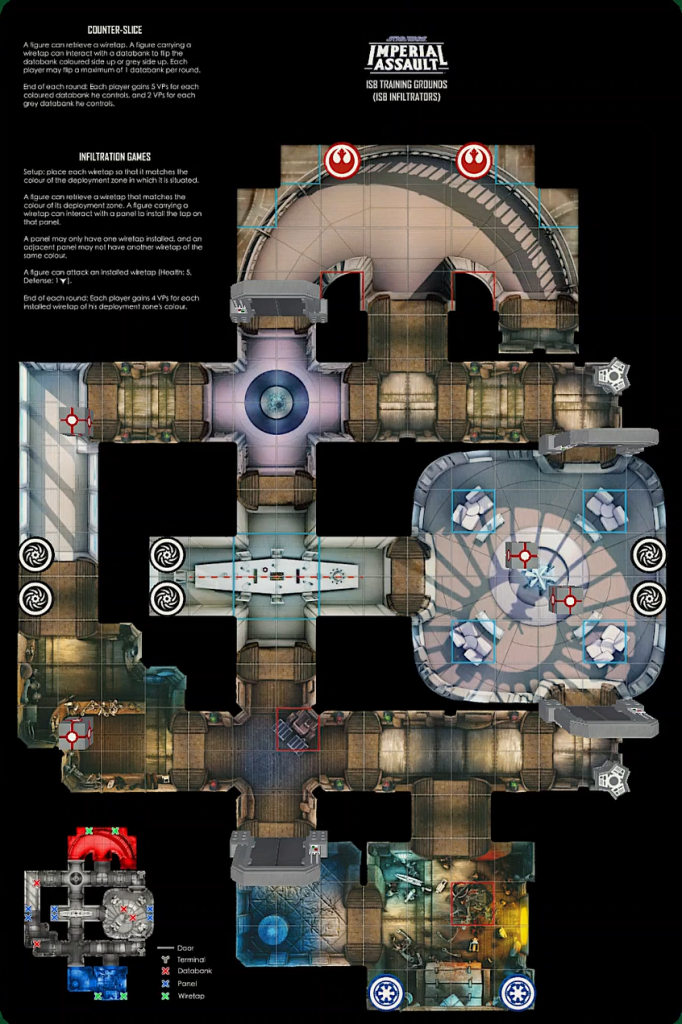
ISB Training Grounds joins Wasskah Hunting Grounds and Coruscant Back Alleys in the IACP tournament map rotation, effective March 11th. Not to be confused with the ISB Headquarters map from Agent Blaise or Training Grounds map from the Kayn Somos pack, this is an FFG designed map that was included in the ISB Infiltrators Villain figure pack, and this will be this map’s first time ever being rotated into tournament play. This map uses map tiles from the Imperial Assault Core set and the Bespin Gambit expansion box.
Missions
Both missions center around multiple objectives on either side of the map which can be modified through the use of the 2 mission tokens in each deployment zone called Taps, short for wiretaps, which can be retrieved by a figure at the cost of an action.
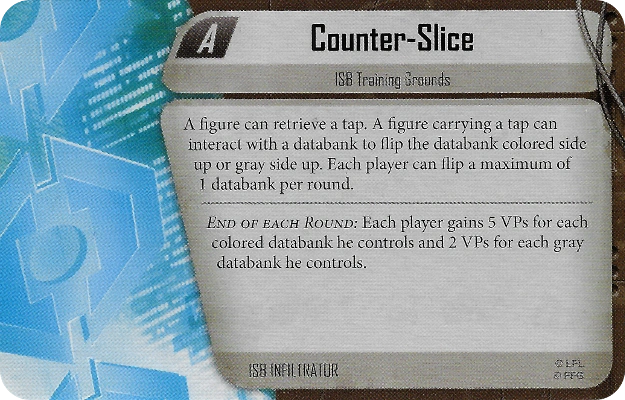
In Mission A, Counter-Slice, there are 4 objectives on the map, 2 of which are on opposing ends of the isolated “elbow” hallway and 2 others clumped together in the center of the Cloud City Penthouse™ room on the opposite side of the map. The objectives start colored side face-down, and players gain 2 VPs for each face-down objective they control at the end of each round. A figure that has retrieved and is carrying a tap token from their deployment zone can interact with an objective to flip it to its colored side, or flip it back to its gray side, once per player per round. Colored objectives controlled by a player are worth 5 VPs at the end of the round rather than just 2. It’s good to remember that it is possible to flip a databank face down again, in the case where you know you’re going to lose control of a databank to the opponent for that round and probably also going to lose your tap carrier, you can flip that databank face down before you do, in order to deny the opponent those extra VPs.
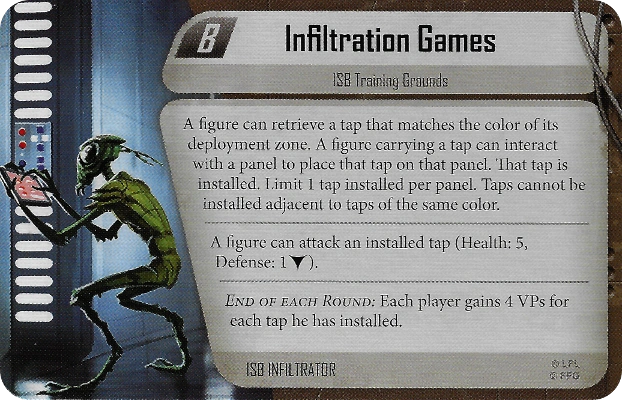
In Mission B, Infiltration Games, neutral mission tokens are placed in 3 locations across the center of the map as pairs called panels, and figures carrying a tap can interact with these panels to install the tap, placing it onto the panel. Once a tap has been installed onto a panel, that pair of mission tokens cannot have any other taps installed, and will generate 4 VPs each round for the player that installed it there. However, once installed, a panel can then be attacked and has 5 health and 1 block. Once destroyed, taps do not regenerate, meaning that it’s possible to destroy a player’s only ways to generate VPs from objectives on this map once they have made the move to install both of their taps.
In this mission specifically, players can only retrieve a tap that matches the color of their deployment zone. This means that if a player’s figure that is carrying a tap is defeated and drops the tap, that figure’s opponent is not allowed to retrieve that tap from the map, only their own taps can be retrieved.
Deployment Zones
As with many skirmish maps in Imperial Assault, the deployment zones may appear to be mostly symmetrical at first glance, but there are several key differences that should be noted.
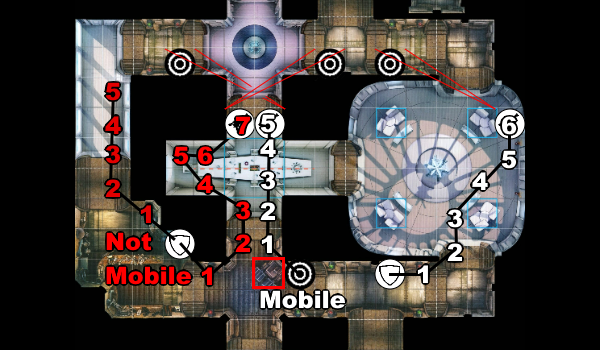
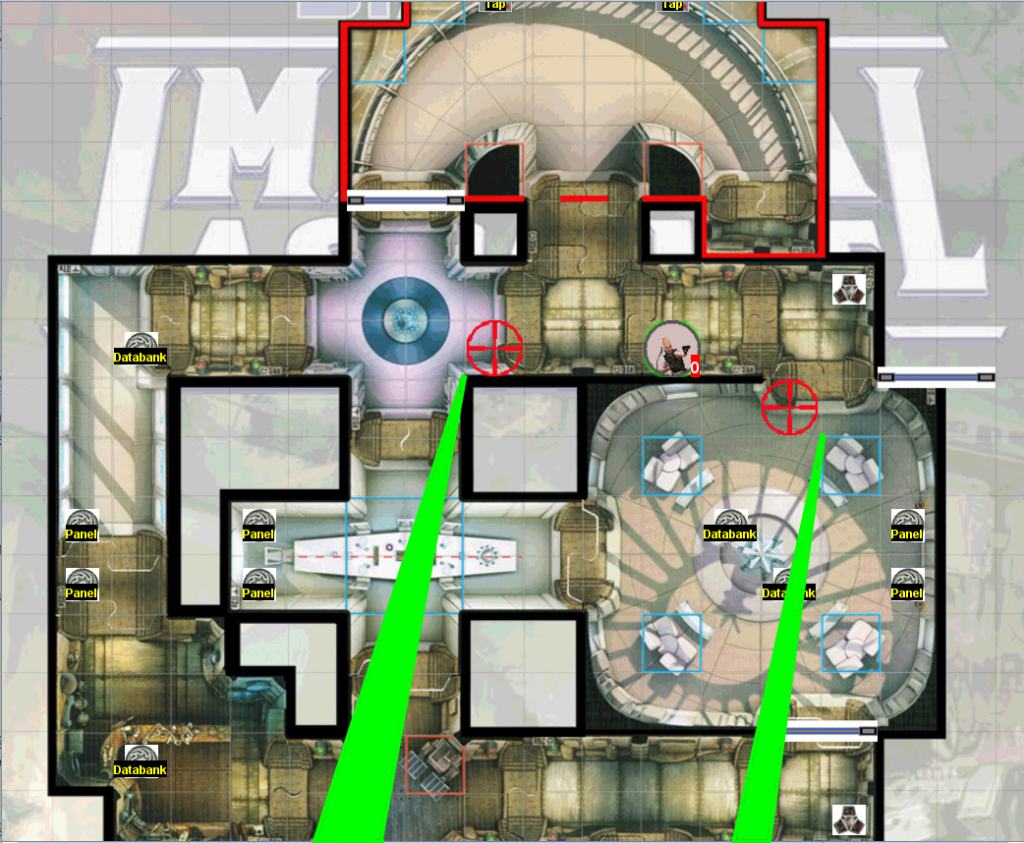
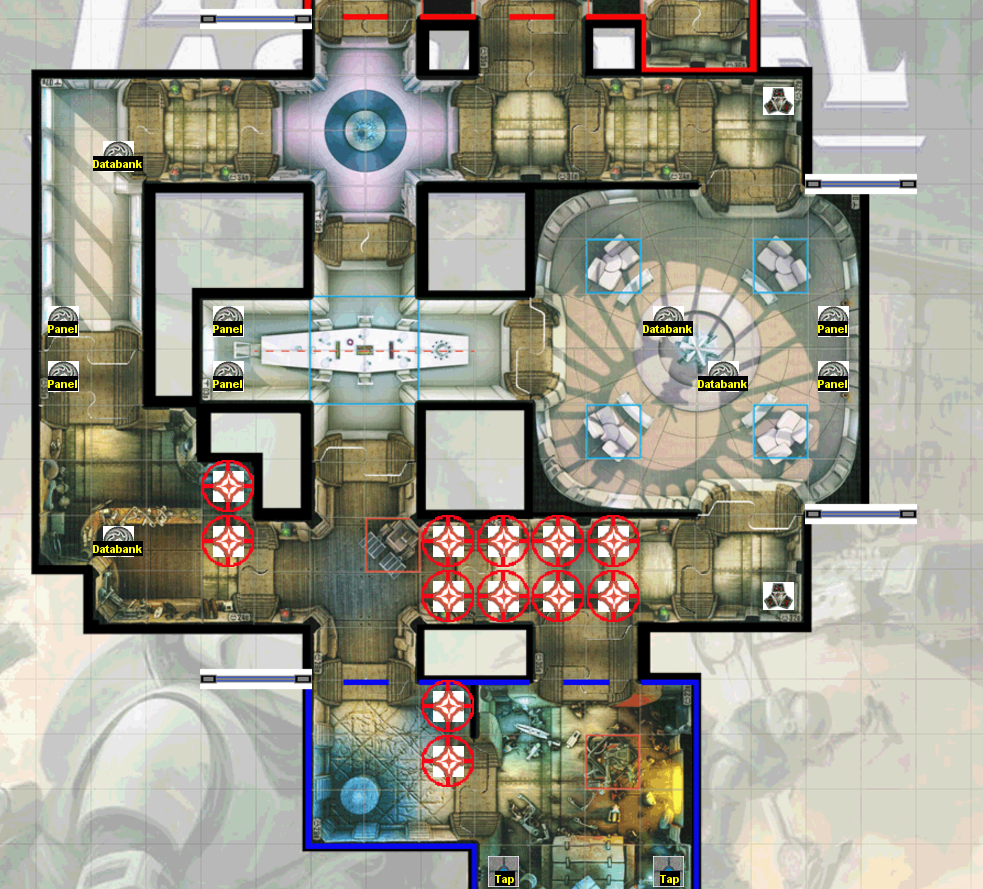
Both deployment zones have their central entrances blocked by an unlocked door which can be opened by a figure without exiting the deployment zone. Care should be taken when choosing to do so however, as this will expose that side of the deployment zone to long-range enemy fire from the opponent’s side of the map, but it does open up movement shortcuts from the deployment zones to the isolated “elbow” hallway and its objectives, and thus can be an important part of your early-game strategy for controlling the objectives.
The Blue deployment zone has a blocking terrain space that juts out into the center hallway. This mostly just makes it harder for figures deployed near the blue player’s terminal to pivot over to attack figures in the center hallway though, and doesn’t provide much extra in terms of cover from the middle hallway. This has the effect of making it more difficult for the blue player to control the objectives in the center of the penthouse tile, as Red is more easily able to attack into that room from the middle hallway. The blocking terrain square does make it harder for Red to attempt to get line of sight to Blue’s terminal by moving down the Elbow Hallway for a flanking position though, and it does become a real advantage for mobile figures that can use it to stand 1 space closer to the middle pathway without having their movement impeded by it.
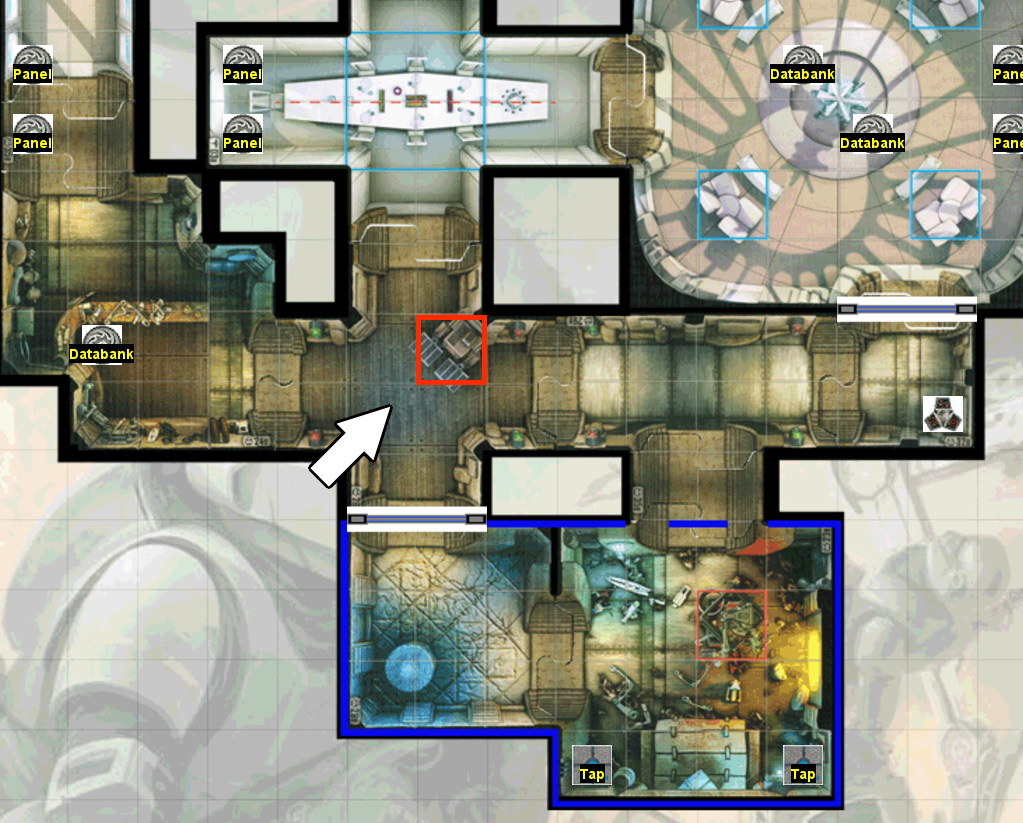
Another small advantage Blue has is that it can advance slightly deeper into the Elbow hallway while still being relatively safe from the opponent’s line of sight. Adding to the lack of blocking terrain in the red zone’s terminal corridor to protect from attacks coming from this hallway, this makes the Elbow hallway a possible location for Blue to push forward and set up attacks into Red’s terminal.

The Red deployment zone has somewhat better access to the map overall without needing to open its deployment zone door. Red is generally better able to control both the penthouse room and the middle lane with ranged figures strategically placed between each pathway, meaning that Red will often be the side that is slightly better able to control the 2 objective tokens in the penthouse, compared to Blue which has slightly better control of the elbow hallway’s objectives.
Red does have a terminal that requires 4 movement points to reach from the deployment zone, a major consideration for players using R2-D2 in their list. Red also has a perfectly Jabba-sized Alcove that is tucked away out of any easy sightlines from outside the deployment zone, which can make the Red zone ideal for players using Jabba.
Early Positioning
ISB Training Grounds is a map that rewards patient and protected early-game positioning, as it is quite difficult to push into the middle of the map on turn 1 without leaving your figure exposed to enemy fire that is difficult to punish. Your early game will most likely be spent marshalling your forces into your respective main corridors just outside your deployment zone. Avoid leaving figures exposed and giving your opponent easy attacks of opportunity, even if they seem like they would be long-shots in terms of accuracy. The best way to stop an opponent from getting lucky is to prevent them from rolling dice whenever you can.
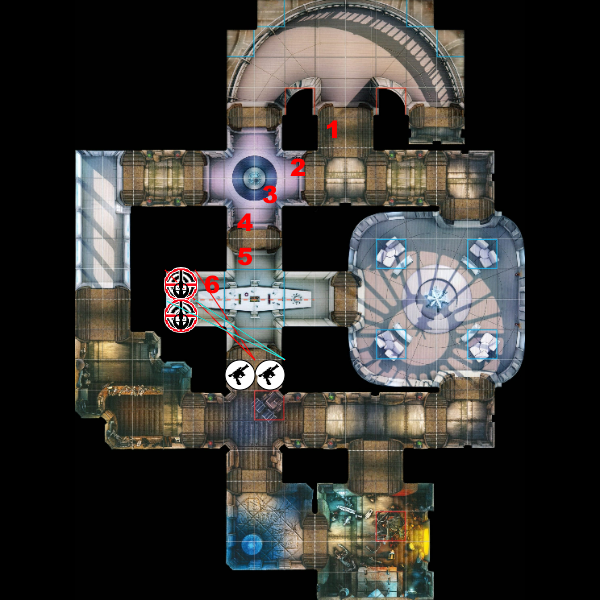
For the red deployment zone, these spaces are going to be extremely safe from attacks on round 1, while giving you excellent vantage points from where you can threaten key positions in the center of the map by moving 2 spaces while still being able to pop back to safety by moving back 2 spaces.
For the Blue deployment zone, you’ll want to use these spaces for the same purpose. You’ll need to be careful when positioning on the left in the elbow hallway though. While these 2 spaces are very safe on round 1, the red zone opponent can easily reposition their forces to be able to attack you once you’ve placed figures there, so try to place powerful and fast figures in these spaces that can threaten any figures the red player moves to the left side to oppose you. With speed 5 or equivalent movement point bonus card, a figure standing in this space can move far enough to draw line of sight to any figures standing on these 2 rows of the map.
If you are on the red deployment zone, it is possible to try and sneak 2 figures down the middle pathway on round 1 by hiding in the this recessed area next to the dining table, and the blue player will have to push pretty far into the middle hallway to get line of sight. However I have not seen this work well in practice, as there are plenty of ways for the blue player’s figures to get the extra movement they need to punish this maneuver before the end of round 1, and they can also attack those spaces while controlling the databanks in the penthouse room. But it’s something to keep in mind as the red player in case you have initiative going into round 2 and the blue player’s initial deployment doesn’t allow them to move forward enough to punish you.
It’s important to remember for this map that the objectives need to be tended to with an action to retrieve from the very first round. This means that you will generally want to choose 2 of your figures to each stand next to a Tap token near the back of your deployment zone when you deploy, so that you’re not having to waste movement points in the early round backtracking figures to pick up the Taps. You’ll want to choose figures that aren’t too slow and will have some actions to spare during the mission to retrieve the Tap and interact with the maps objectives, so figures like Officers, Hired Guns, Alliance Smugglers are great, as are mid-cost attackers like Hera, Doctor Aphra, and Thrawn.
It is generally a good idea to plan to open your deployment zone door on the first round when playing the Counter-Slice mission, to make it easier for one of your tap carriers to be able to get to the closest databank in the elbow hallway on the following turn to boost your VP gains. I don’t think it’s a good idea to open your terminal door on round 1 unless you either have a terminal sitter that is very hard to attack, like a Scout Trooper or Hidden alliance smuggler, or you feel that you can control the 2 objectives on Counter-Slice and come out on top in a ranged fire fight between the two terminals if your opponent opens their door to attack your objective sitter. A better strategy is to sit an attacker next to the terminal door so that it can open the door and attack in a single activation.
Strategy
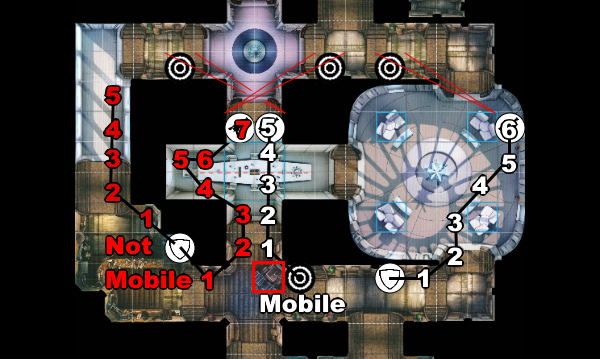
ISB Training Grounds rewards carefully thought out and decisive play. There is simply no forced aggression on this map, because it’s not really possible to attack the opponent’s safe spaces without exposing your figures to being attacked first. On the penthouse side, even if both doors are open, it will take 6 spaces to move from the closest safe space on one side to a space that has line of sight to the closest safe space on the other side, and 8 spaces if you’re a melee figure. The middle lane is the worst place to force an attack from, it takes 7 spaces to force line of sight from the closest safe space on the blue side to the closest safe space on the red side, and 10 spaces to do it vice versa from red side to blue, and its 10 spaces both ways if you’re melee.
Being mobile does reduce this to 5 spaces from the blue side to get line of sight, so be aware that figures like Boba and Super Commandos with Fuel Upgrade can actually force an attack from a safe spot in a single activation from the blue side.
The strongest strategies on this map are going to be ones that can either generate huge amounts of movement points with a single action to be able to get figures past the map’s no-man’s-land spaces and attack, or lists that can comfortably wait until they are going to reliably have the last activation of the round and the first activation going into the next round. Using the end of round initiative change to effectively chain a group’s activations back-to-back will allow figures to attack the opponent’s dug-in figures and then either move back to safety or use the opportunity to move the rest of their forces forward while they distract the opponent’s attackers long enough for the rest of the army to advance.
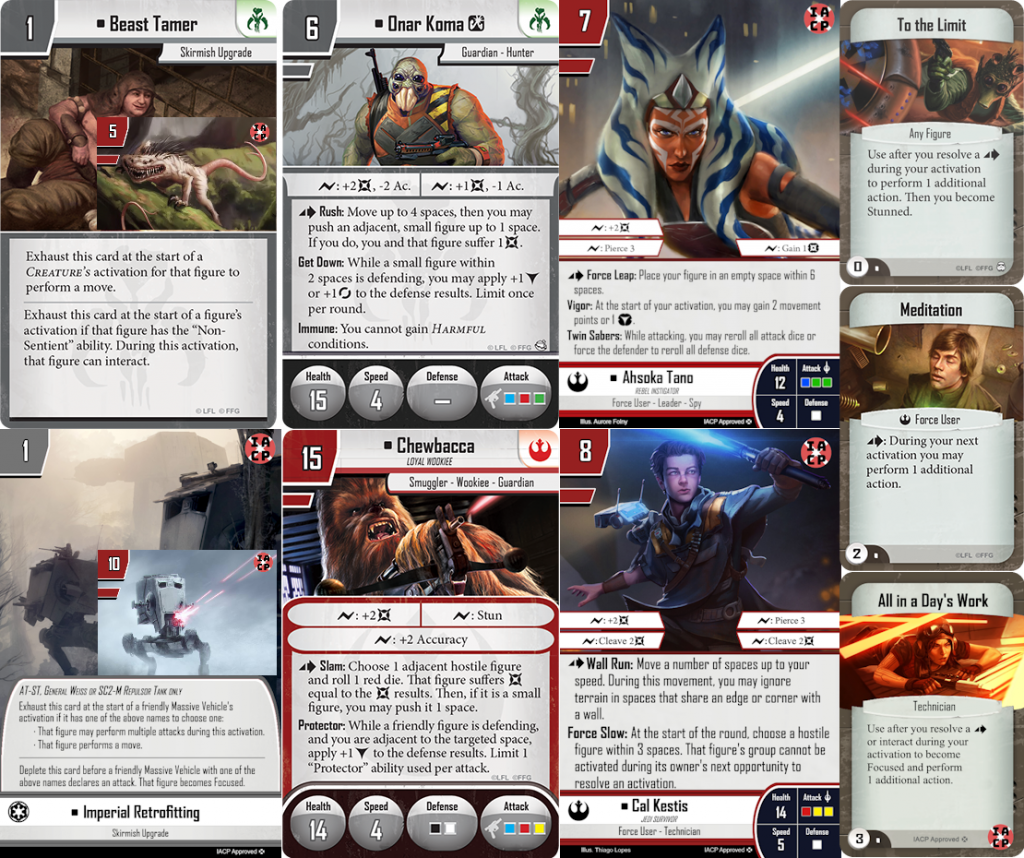
It’s not enough to just rely on extra movement from Imperial Officers or Gideon either, as that will still just leave your figure exposed to ranged attacks before it can activate The best movement abilities will be ones that can generate an additional action’s worth of movement points in the same activation as the figure that’s moving, such as Beast Tamer and To the Limit.

Because it’s so easy for aggressive figures to cut themselves off from supporting attackers and become isolated and vulnerable behind enemy lines, it’s especially important on this map to be aware of how the initiative token is going to swing at the end of each round before you decide to commit to a big push into enemy territory. If you push into the opponent’s territory with an aggressive play at the end of this round, are you going to have the advantage of having initiative in the following round? Do you have Negation to protect your initiative? Are you relying on Take Initiative and opening yourself up to being Negationed and your attacking figure gets deleted at the start of the round by your opponent’s strongest attackers? Start thinking from round 1 and even during deck building how you can set up your offensive play at the end of the round to coincide with the initiative passing to you in the following round.
What will often happen then, is the winning strategy will just be to wait a turn or even two until you have the setup you need to safely push into the opponent’s backline for a big offensive play. The player that can setup their positioning in a completely safe spot and then hold their ground until the moment is right to strike should be able to create winning scenarios by doing so.

Lists that have enough ranged firepower to control all 3 approach lanes can focus on playing the objectives so that their opponent falls behind in VPs on every turn that they don’t push their figures forward to attack or control objectives. On Counter-Slice, this means controlling at least 3 of the 4 databank objectives each turn. On Infiltration Games, you’ll want to make sure you can attack any panel that the opponent is positioned to install a tap onto that round, to prevent them from scoring VPs with it, and you’ll want to make sure you get at least 1 tap installed on a panel with the last activation of a round so that your opponent can’t destroy it before you score your 4 VPs. Any lead in VPs you can create on Infiltration Games will put pressure on the opponent to act, possibly before they are ready.
This slower pace of play sometimes means it can take a long time to get to 40 points if both players are playing optimally. If you’re not already doing so, I highly recommend playing this map with a timer (generally 75 minutes).
Winners and Losers
As mentioned previously, cards like Beast Tamer and Imperial Retrofitting can generate enough additional movement to allow figures move far enough to get an attack off without having to spend a round in an exposed space. Meditation has also been working really well, though the timing can be tricky so that it goes off when you have initiative coming to you in the next round. To the Limit can also be a way to be able to attack after a move action and a special move action like Urgency, Rush, or Force Leap. Technicians can also use All in Day’s Work, either in a similar manner as To the Limit with something like Cal’s Wall Run ability, or with a figure like Chewbacca who can take a double-move action, then use his Slam ability without spending an action thanks to Wookiee Avenger, and then perform an attack with All in a Day’s work, which the official FFG rules say still counts as a special action and can still trigger cards like To the Limit. Droid lists can use Overdrive to gain an extra Move action for a round as well.
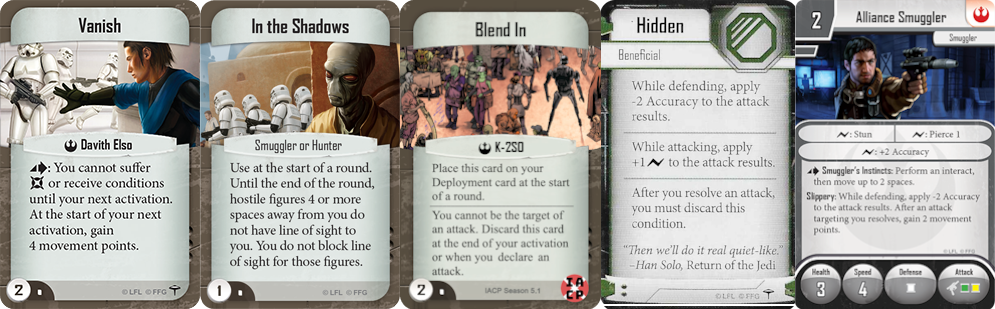
Another way to try to get a figure into attack range without it getting killed at the halfway point are cards that give a figure temporary impunity from attacks. Cards like Davith’s Vanish, K-2SO’s Blend In that give these figures a window where they cannot be damaged. Cards like In the Shadows and Hide in Plain Sight might also be more useful now as well. Scout Troopers especially shine here as they have this ability built-in with Camouflage. Finally, Alliance Smugglers can combine their Slippery -2 accuracy ability with a Hidden token from Murne to serve as terminal or objective sitters that can be more challenging to hit at range, and are also excellent at interacting with the doors and objectives thanks to their Smuggler’s Instincts ability. Pay attention to which of these abilities will still allow these figures to block line of sight, as that makes them even more valuable for giving your other figures a way to move forward without being seen.
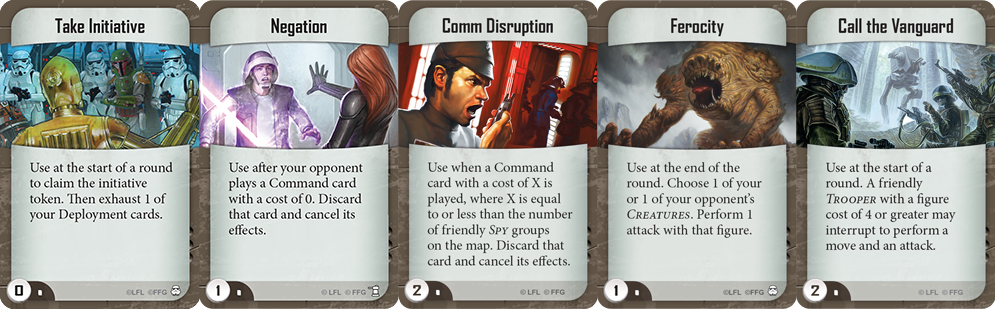
Cards which can force a favorable EOR/SOR initiative swing to happen sooner in the turn are also very handy in this map, such as Devious Scheme to give the opponent initiative on round 1 or Comm Disruption to stop Negation from stopping your Take Initiative play. Same with abilities that allow a figure to interrupt to attack in between rounds, like Call the Vanguard, Ferocity, Han’s EOR attack, and the Scavenged Walker’s EOR attack.
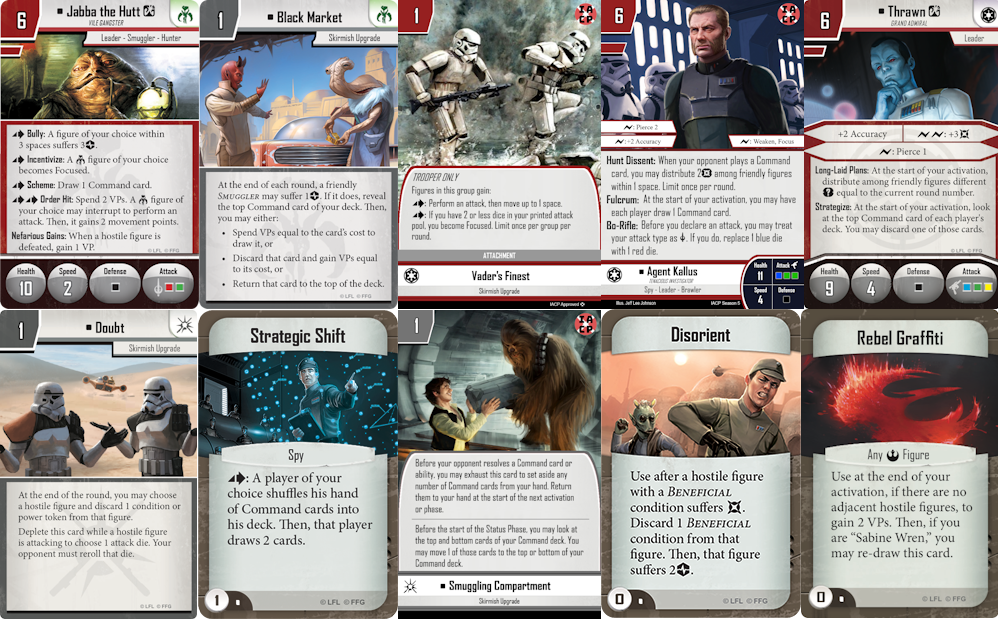
Since players might have to wait a turn or two before they can force a favorable engagement, cards that can slowly accumulate value over time will become more powerful on this map, such as figures that can generate a Focus token each round, or draw extra cards each round. Cards like Jabba, Agent Kallus, Vader’s Finest, and Black Market will be able to generate extra value on a map like this. But also cards that can slow down the accumulation of value over turns will also be stronger on this map as well, like Doubt, Lure of the Dark Side, Disorient with Palpatine’s Tempt, Murne’s False Orders if she can get close enough, and especially Strategic Shift. In fact, Strategic Shift can be so devastating on this map against a player that has accumulated a big hand of cards while waiting a turn or two to make their move, that a lot of players are predicting that Smuggling Compartment will see a surge in usage because of this map just to counter strat shift, which is now spurring discussion around whether it will be better to try to force through the Smuggling compartment with hand disruption deployment cards like Agent Blaise or Headhunter, or just better to not bring Strat Shift to avoid having it as a dead card in hand.
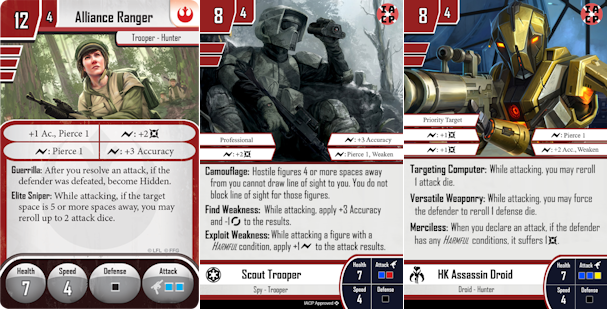
More big winners are multi-group sniper figures in high activation count lists to be able to really punish any forced aggression by being able to attack with multiple figures before the opponent can continue their offense, groups like Alliance Rangers, HK Assassin Droids, and especially Scout Troopers, which now have limited access to Focus through Vaders Finest and can basically dominate any sniper war thanks to their camouflage ability.
Spies are also a big winner thanks to having access to Strat Shift and Comms Disruption. Ahsoka is especially good on this map among Force Users thanks to having both Vigor and Force Leap.
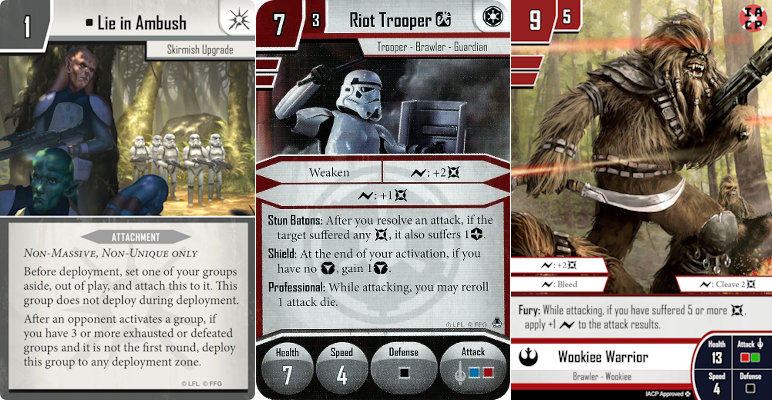
So far the main losers for this map are any melee lists that don’t have a way to supercharge their mobility to get an attacker into range without it getting immediately attacked enroute. These are generally lists that had relied on having very efficient Health to points cost ratios and would try to overwhelm the opponent with hard to kill figures, such as Wookiee Warriors and Riot Troopers. Lie in Ambush is probably the best answer for these lists to be able to force an engagement in round 2 and follow up by rushing their other figures in at the end of round 2.
Final Thoughts
ISB Training Grounds is a map that created some initial concerns with the ability of melee and close-range attackers to be able to function, but ultimately we are already seeing a ton of innovation in those types of lists from players getting in the lab and figuring out ways to overcome these challenges, and already it’s given rise to what might be one of the strongest iterations of Jedi Force Users list yet. Players who have built their lists with the right tools to get their figures into range, who correctly manage the maps objective play, and who can use the EOR/SOR Initiative swing to create powerful last/first activation plays, should be able to find success on this interesting map, regardless of their chosen list.