

IACP Skirmish Army Building: Beyond Face Value (for new players)
When I first dipped my toes into the skirmish side of Imperial Assault, I randomly slapped together some cards that added up to 40 making a team for each faction (FFG only). Next, I found a tier list online and put together teams of mainly tier 1 and 2 characters. After a few round robins, I realized that the mercenary faction was always winning due to the common synergy of hunter/smuggler traits while my other lists had many different traits. I then entered the IACP community and threw together as many IACP deployments as possible to test out what I could from the somewhat overwhelming amount of new choices. Luckily, we have a very friendly community of members who are more than willing to suggest ways to improve your list. I quickly learned the importance of including multiple figures with a couple of common traits in order to allow for a useful command deck where cards aren’t wasted after figures start being defeated. I also learned why Rebel Care Package (RCP – Gideon Argus, R2-D2, C3P0) is included in every Rebel list, and Zillo Technique and Rule by Fear in every Imperial list. From here, I started actually winning the odd game or at least having more close games.
One of the goals of the Imperial Assault Continuity Project is to bring all cards to a similar power per cost level. Being on its seventh season where some cards that were previously adjusted are being revisited, the difference in power between the “best” 7 point figure (for example) and “worst” 7 point figure has gotten quite small. At this point, creating a competitive list seems to involve more than just a group of “good” deployments with similar traits. It is necessary to find interactions between deployments that amplify their abilities or mitigate their weaknesses. Therefore, I have come up with a list of such interactions that are commonly seen as you play more competitive matches. This article will focus solely on Deployment cards, particularly pairs or small groups that work together to enhance each other’s abilities.
TVboy’s Editor’s Note: The original author occasionally references pre-IACP versions of cards. To keep the article from being too crowded with images I’ve limited images to 1 version of each card, but you can use https://classic.tabletopadmiral.com/imperialassault/ to quickly search for a card and view both it’s original FFG printing and it’s updated IACP version for easy comparisons.
Rebel Faction:
Han Solo: C-3P0, Ko-Tun Feralo, Jyn Odan
Cunning/Distracting/Evade Tokens
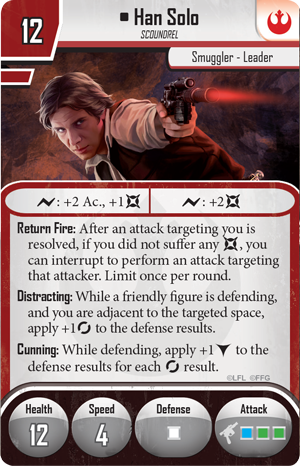
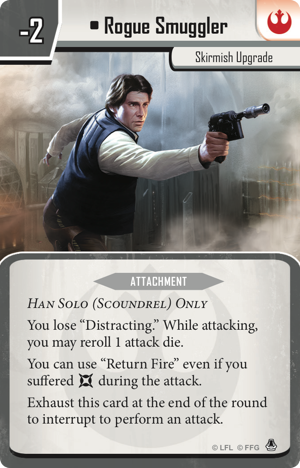
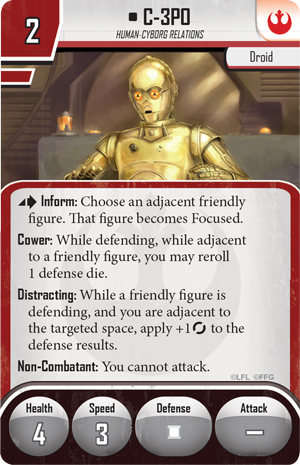
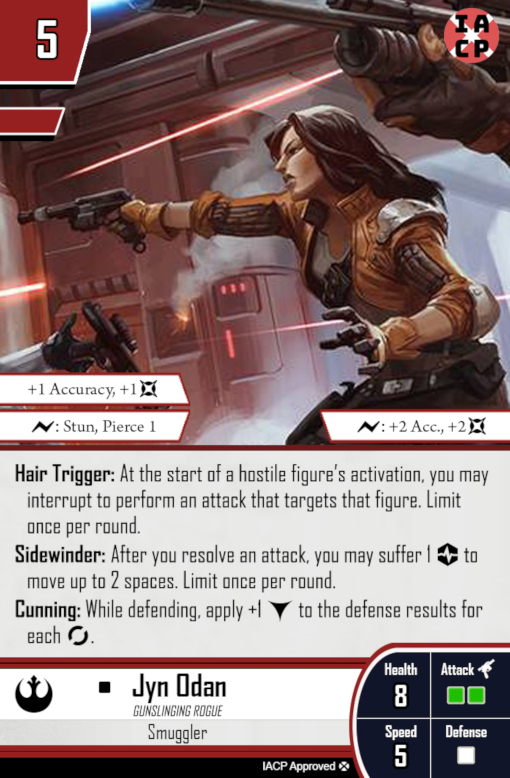
Although C-3P0 should be in almost every Rebel list as part of the RCP anyway, and Han Solo is only usable within the Rebel Faction due to his skirmish upgrade being Rebel only, Han Solo will always be accompanied by C-3P0. This is because when Han sits adjacent to 3P0, he not only gains an evade from the droid’s distracting ability, but a block due to Han’s cunning ability. Ko-Tun’s adjustment in IACP allowing for Arms Distribution to distribute a token of any type instead of only a damage or block token, means that she can also give Han evades to set off his Cunning ability. Jyn Odan being another Rebel smuggler with the Cunning ability means she synergizes well with Han too. Keeping her close to Han where she can see potential threats approaching also allows her to use Hair Trigger in an attempt to stun these threats. Your opponent will also think twice about whether their figure can survive a Return Fire shot from Han AND a Hair Trigger shot from Jyn, especially if they are both focused.
Speaking of Ko-Tun, her abilities obviously go well with other token generators such as Cassian and CT-1701. She also can be used to provide an attack die reroll to figures with inconsistent attacks such as the Rebel Saboteurs with her enhanced Dead Precise ability, although Luke Skywalker (Hero of the Rebellion) can do this more effectively with his Inspiring ability.
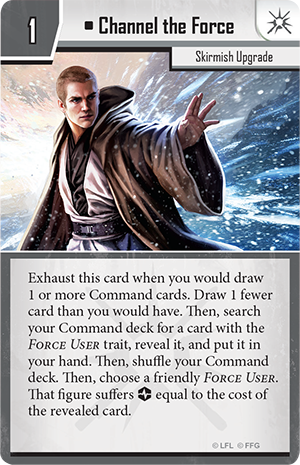
Yoda: Luke Skywalker (Jedi Knight), Channel the Force
Deflect/Force Deflection, Wisdom/Search command deck instead

Yoda was created to support rebel force users. However, pairing him with Luke Skywalker (Jedi Knight) can be especially scary for the opponent. Luke’s Deflect allows him to throw an unblockable damage at a hostile figure in his line of sight every time he or an adjacent figure is attacked. Yoda has a once per round Force Deflection with the same trigger, however, his ability returns damage equal to the number of attack dice rolled back to the attacker. Tempted to break through strong defenses, someone may want to have a 3 dice attacker take a focused shot at one of the two. If the attacker is in line of sight to Luke and the two mentioned are adjacent to each other, this will result in the attacker suffering 5 unblockable damage. And good luck getting a surge through if you target Luke with C-3P0 right behind him!
Another interesting interaction is between Yoda’s Wisdom ability and Channel the Force. The slight downside of Wisdom is having to return a card to the bottom of your command deck. However, given the wording, if Channel the Force is exhausted to replace the “draw 1 Command card” with searching your deck for a card with the Force User trait, then the player did not actually draw a card with Wisdom, the required conditions for the 2nd part of Wisdom are not met and no cards are placed on the bottom of the deck (quoted from the FAQ).
Cara Dune: Unshakable

You don’t want your queen piece stunned and unable to both move and attack in their activation. Brawlers are even more frequently stunned as they will always have a copy or two of Parting Blow in their command deck. There are many command cards to choose from to remove harmful conditions. However, these cards often need to be played during the figure’s activation. Given that she is also a trooper, she can play Call the Vanguard which grants a move and attack at the start of the round. This makes being able to remove harmful conditions from her at the start of any of your activations very valuable.
Murne: Rebel Saboteurs, Self-Focusers (example: Diala Passil)
Field Report/extra surges
Murne Rin is a support figure who unfortunately has trouble escaping comparison with Gideon Argus. Her original card required many buffs to become a figure that people consider playing. In her final form, she is often chosen over Gideon to support figures with 2 printed attack dice that benefit from access to more surges, or are self focusing. Diala is one such example, with good surge abilities who self focuses. Rebel Saboteurs also have good surge abilities and could theoretically use up to 5 surges in a single attack with their overload ability, while only rolling up to 3 on their dice.
Editor’s Note: You can check out and compare IACP and pre-IACP versions of cards at https://classic.tabletopadmiral.com/imperialassault/
Jyn Erso: Mara Jade, other good surge ability, low surge rollers
Trust goes both ways
While we’re on the subject of providing surges to figures with good surge abilities but low surge attack dice, Jyn Erso can also distribute surge tokens. However, it is important to pair her with a figure that she will stay close to as she cannot Recover 1 damage and gain 1 surge if she is not beside a friendly figure at the start or end of her activation.
K-2SO, Cassian Andor
Continually Unexpected/Cassian said I had to/Strike Team
K-2SO has the melee attack type. However, you may notice he has added innate accuracy and a surge for +1 accuracy. This is because his ranged attack has to be charged up by having him gain power damage and/or surge tokens. One of the ways to do this is his Cassian Said I had To ability, allowing him to gain a power damage token once per round when a leader moves adjacent to him. Cassian being in the ability’s name makes it obvious that they were designed to be paired together. Specifically, Cassian can charge up K-2 in round one by using his Strike team ability to move them both out of the deployment zone and have each of them gain a token. Follow this up by moving Cassian (having the leader trait) into a space adjacent to K-2 and he gains the second token required for his Continually Unexpected special action ranged attack.
Cassian Andor: Hera Syndulla, Rebel Pathfinders
Strike team/Smooth Landing/Infiltration
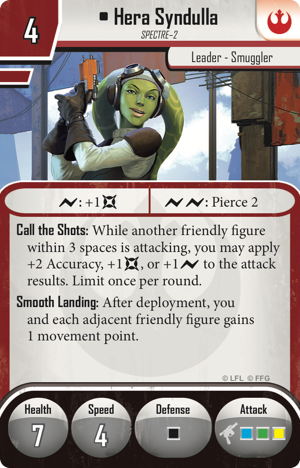
While we’re talking about Cassian, his strike team ability can allow him to move 2 figures (himself being one of them) outside of the deployment zone after deployment. However, it also allows him to distribute 1 damage token each to up to 4 figures. So how do we get 4 figures out of the deployment zone in order to maximize his token distribution? Most commonly, this is achieved by having Hera Syndulla in the list for a smooth landing. Just make sure you think carefully about who is going to end up where after the two of them use their “after deployment” abilities as you set up. Rebel Pathfinders also have “after deployment” movement from their Infiltration ability getting them far out of the deployment zone.
Leia Organa: Motivation
Battlefield Leadership + 1 movement point (Especially pre-IACP)
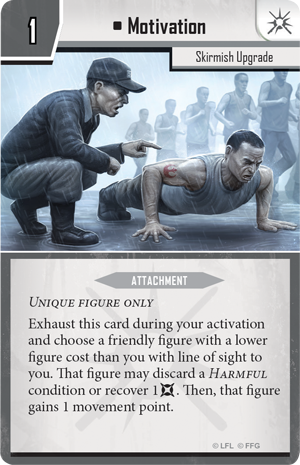
Leia Organa is the figure most commonly paired with Motivation in the Rebel Faction. She has a high enough cost to work with the “friendly figure with a lower figure cost” restriction. More importantly, she has a reason to want to move another figure during her activation which is her Battlefield Leadership ability. The original FFG card did not grant the chosen friendly figure any movement, meaning they would need to be in position already before her special action. This leaves the figure exposed, waiting to get their extra shot off. Motivation, as well as her recently updated ability, allows for the figure to peak around the corner and at least get their shot off before being left exposed to retaliation.
(Editor’s Note: Don’t worry, Palpatine + Motivation gets talked about in the Empire section!)
Wookiee Warriors: Fury of Kashyyyk
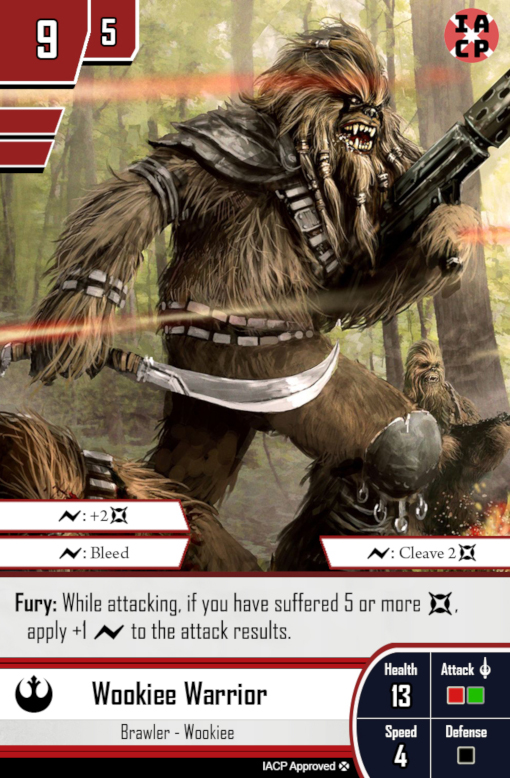

Wookiee Warriors along with the Fury of Kashyyyk upgrade card came out together in wave 3. In IACP, the Elite Wookiee Warriors were recosted from 11/6 with no other changes. As shown above, the Fury of Kashyyyk upgrade was significantly changed, keeping only the original ability while recosting, making it apply to all friendly Wookiees rather than attaching to only one group, and adding reach as well as a pierce 1 when your Elite melee Wookiees swarm an unlucky enemy. This card was designed to mainly benefit the melee Wookiees as they needed the buff while the ranged figures were released or upgraded in the second last wave of the official game. The change from being an attachment has also allowed for the use of Lie in Ambush with this Wookiee group. The Fury of Kashyyyk upgrade card is now as tied to the Wookiee Warriors as Han Solo’s Rogue Smuggler upgrade card.
Imperial Faction:
Darth Vader: Unshakable
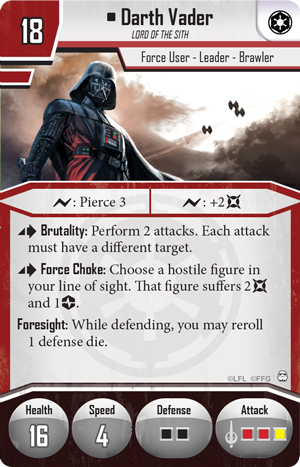
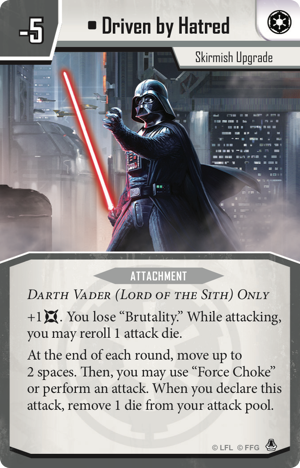

Even before his Driven by Hatred upgrade came out, you wouldn’t want your melee figure queen piece stunned and unable to both move and attack in their activation. Brawlers are even more frequently stunned as they will always have a copy or two of Parting Blow in their command deck. There are many command cards to choose from to remove harmful conditions. However, these cards often need to be played during the figure’s activation. After his upgrade card gave him end of round movement and an attack or Force Choke, being able to remove harmful conditions from him at the start of any of your activations became very valuable.
Kayn Somos, General Sorin (any leader with abilities that affect other figures): Advanced Com Systems
Abilities that affect adjacent figures/extended range
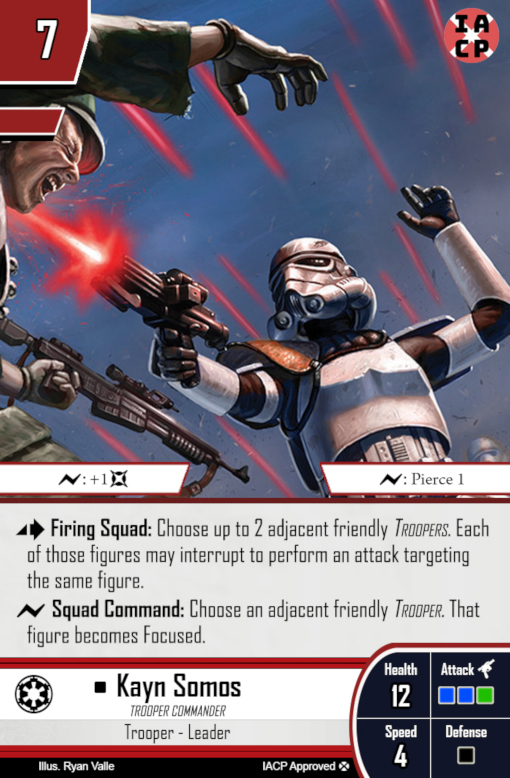
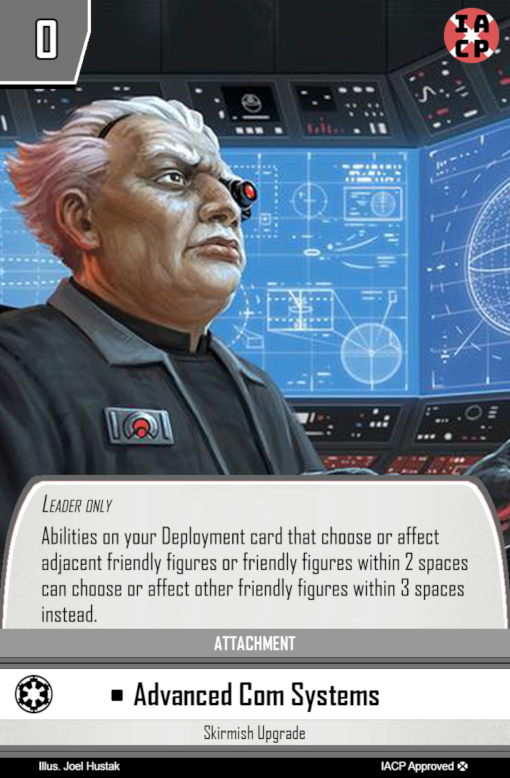
Advanced Com Systems having its cost reduced from 1 to 0 means it appears in almost every Imperial list. Even if there isn’t a higher cost leader who could benefit from an extended reach, most lists have at least one Imperial Officer to tack this upgrade on. Increasing the radius of a character’s reach from 2 spaces to 3 isn’t a huge effect. However, increasing your reach from adjacent figures to within 3 spaces is a significant change especially when the ability can affect up to 2 other figures. This is the case for Kayn Somos who will never be seen without this attachment. In fact, he is the reason that its cost was reduced! According to the Steering Committee, reducing Kayn’s cost to 6 was allowing for some overpowered interactions between him and Death Troopers, as well as the Strength in Numbers command card. Rather than keep these negative interactions, Kayn was valued at 7 (an already significant lowering from the original 10 points) and the accompanying attachment reduced by 1 point instead.
Director Krennic: Death Troopers, other token generators
Unhinged Director/Squad Captain
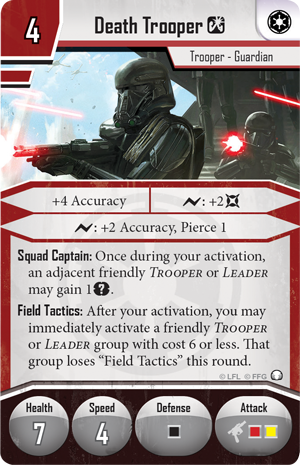
Although it may seem obvious given that the image for Director Krennic includes them, Death Troopers pair well with him. More figures that generate tokens, especially ones with the Trooper and/or Guardian trait, will provide more opportunities to use Krennic’s Unhinged ability, since he is only handing out one per round. This means figures like Agent Kallus, Iden Versio, Thrawn, and even Migs Mayfeld through Temporary Alliance, will help you amplify his utility.
Emperor Palpatine: Motivation
Emperor/+1 movement

(If you’ve already read about pairing Leia with Motivation, it’s the same reasoning for Palpatine)
Emperor Palpatine is the figure most commonly paired with Motivation in the Imperial Faction. He has a high enough cost to work with the “friendly figure with a lower figure cost” restriction, especially given the number of low figure cost groups available. More importantly, he has a reason to want to move another figure during his activation which is his Emperor ability. Although a free ability to use anytime during his activation, it does not grant the friendly figure any movement meaning they would need to be in position already before the ability is used. This leaves the figure exposed, waiting to get their extra shot off. Motivation allows for the figure to peak around the corner and at least get their shot off before being left exposed to retaliation.
Editor: Motivation also combos really well with The General’s Ranks to turn that 1 movement point into 3!
ISB Infiltrators: General’s Ranks
Both the General’s Ranks and ISB infiltrators deployment cards had significant changes in IACP. On top of the recost and change from Unique to Elite, the upgrade card was also reworded so that the additional movement points are added at any time movement points are gained outside of the figure’s activation. This was likely the intent of the original card, as there are very few ways to have a figure “perform a move” outside of their activation in skirmish.
The ISB’s adjusted Coordinated Raid ability allows more flexibility to select other figures of equal cost for an out of activation attack. However, even their original ability benefits from attaching General’s Ranks to the group itself. Although there will almost always be an Imperial Officer in an Imperial army anyway, multiple will often be included with General’s Ranks to capitalize on the extra movement points.
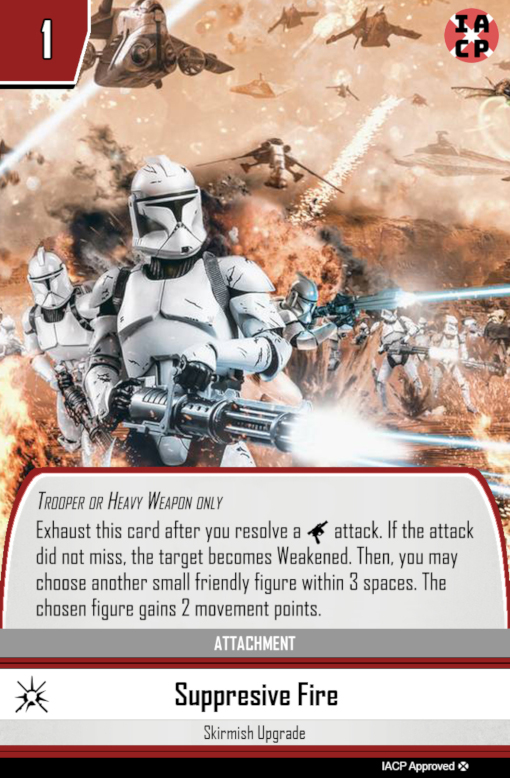
Editor: I wanted to also include another fun combo with ISBs, which is Suppressive Fire. You can have the ISB Infiltrator use Coordinated Raid to give an attack to another figure that has Suppressive Fire attached, then exhaust Suppressive Fire to give the ISB 2 movement points so it can move into position and save its 2nd action to make its own attack, possibly against a now Weakened target. It doesn’t combo with General’s Ranks since it’s still the ISBs activation, but it doesn’t hurt to include both in a list either.
Mercenary Faction:
4-LOM: Beast tamer
Programming Override/perform a move
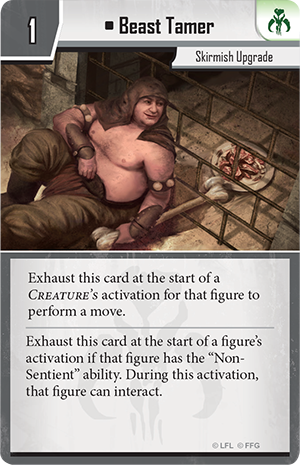
Similar to the interaction between K-2SO and Cassian Andor, it is obvious that 4-LOM and Zuckuss were designed to go together. However, one does not simply unlock 4-LOM’s potential by this pairing. More commonly, he is seen paired with the Beast Tamer upgrade. When first looking at his Programming Override ability, it is easy to see that this would give him flexibility to be added to almost any list as he could gain the common trait and use most of the command cards.
Beast Tamer helps to mitigate the limitations of creatures, being melee attackers that are often large or massive and even slow, like the Wampas, making them sometimes awkward to move into position. 4-LOM is, of course, a small, ranged attacker with a speed of 5! Giving him an extra move creates a heavy hitting figure who is difficult to hide from and also difficult to chase down. Other non-attachment upgrades include Heavy Fire, Channel the Force, and Black Market. However, 4-LOM is not a figure well suited for suffering strain or harmful conditions. It is also important to note that he cannot gain the extra trait during deployment and therefore cannot equip attachments that require traits other than droid.
Wampa: Lie in Ambush (+ Beast Tamer)
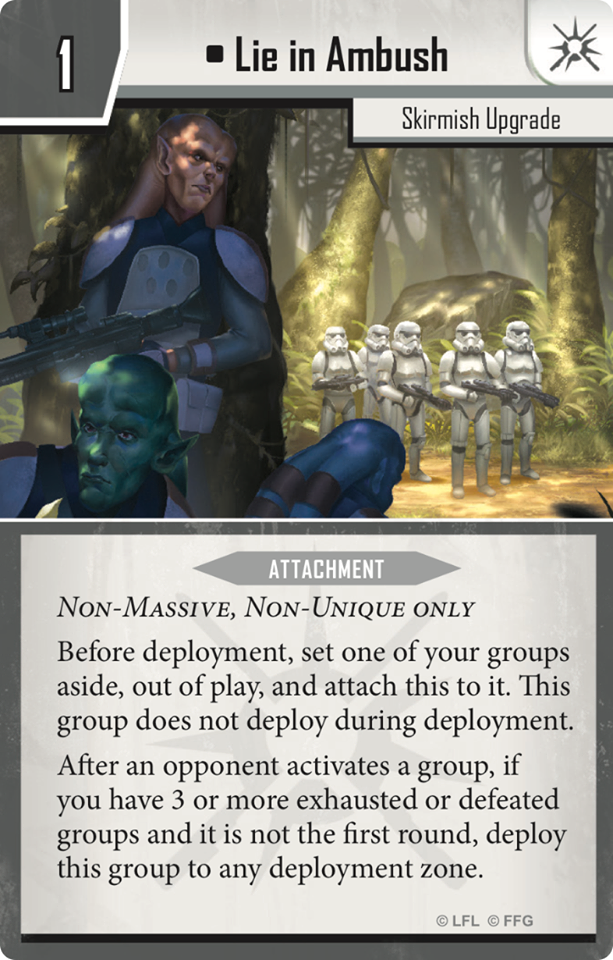
Although a very thematic design, the original Wampa’s slow approach and lack of reach made them easy to avoid. Beast Tamer helps with this issue, as well as the adjusted Hunger ability and added Reach. Another way to get this creature into the battle is by having them Lie in Ambush. The impending doom of knowing a heavy hitter is going to land in the opponent’s deployment zone has an immediate effect on how they play their first two rounds. There are two main options: get as far away from the deployment zone as possible or hang back and prepare to focus down the figure after they have deployed. Either way, the Wampa is likely to land with 6 movement points to get within reach of a suitable target. With 12 health and a defensive token, they are likely to last through the round and hopefully get a second attack in unless your opponent has saved their own heavy hitters to deal with the creature, taking the focus away from your other figures.
HK-47: Headhunter
Mockery/discard from hand instead of suffer strain
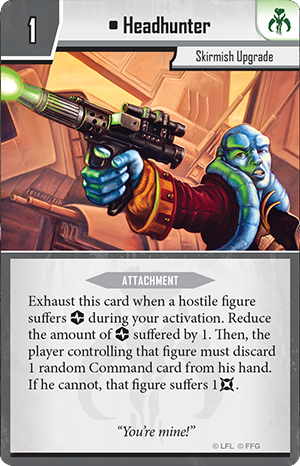
When allocating your precious 40 deployment points, you want to make sure that each point is doing something for you. This is especially true when deciding to bring an attachment. Is this group going to benefit from the attachment enough to warrant the cost? How often will they be able to use it? With an attachment such as Headhunter that is exhausted when used, you are limited to one use per round. Therefore, every round the ability isn’t used diminishes its value and adding it to a multi-figure group doesn’t increase its value. HK-47 with his Mockery ability allows you to have a figure suffer a strain just by having line of sight. This gives him a high chance of being able to deal out a strain every round, allowing the highest value to be gained from the Headhunter attachment.
Jabba the Hutt or Jawa Scavenger: Black Market
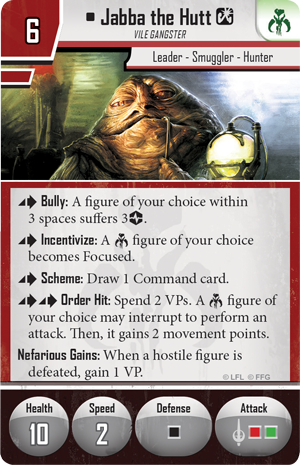

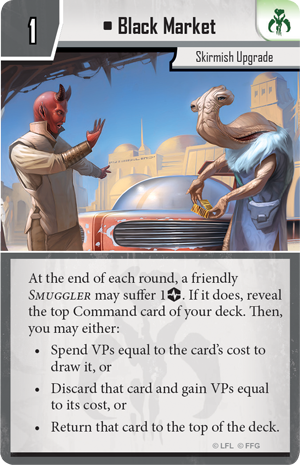
Drawing command cards quicker than your opponent can often mean you are ready to engage before they are. Black Market is one way to increase the rate of drawing command cards, though it does have costs. One of these costs is having a smuggler suffer a strain just to look at the top card. This cost can be mitigated by having the strain suffered as damage by a figure who will not enter the fight anyway. For this reason, the upgrade is often seen in lists with Jabba as he often doesn’t even move after being deployed and therefore only sees the action if the opponent enters your deployment zone. Sometimes an Elite Jawa is used mainly to bring in out of faction droids through Scavenged Stock and becomes a terminal sitter who is also a good target for this strain cost.
Maul: Darksaber
Dual-Bladed Fury/Extra attack
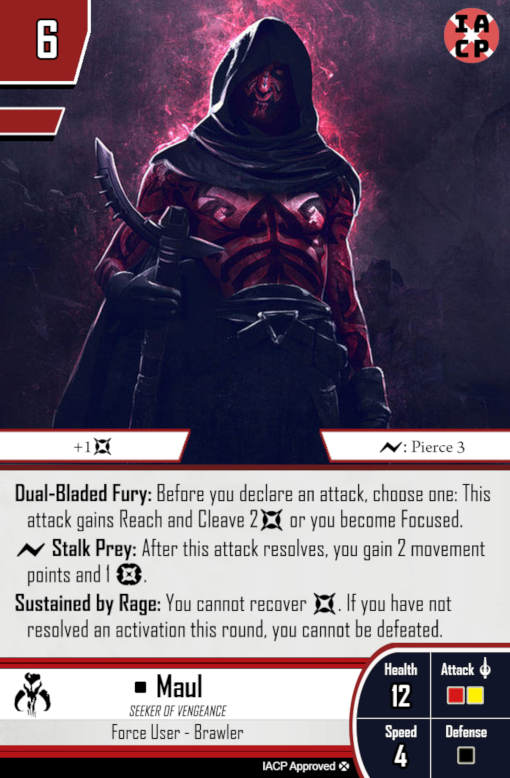
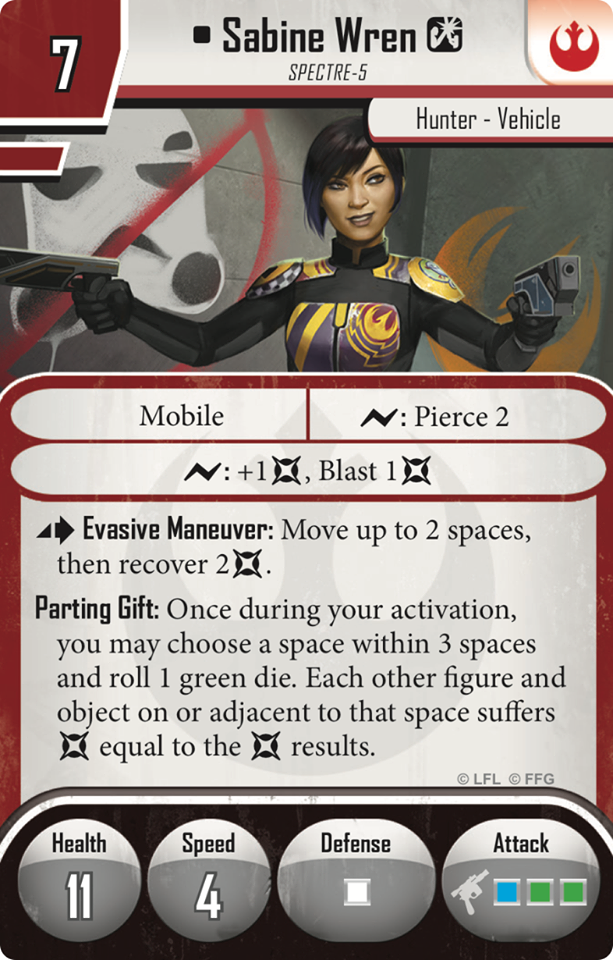
Although thematically designed to be usable by either Maul or Sabine Wren, Maul sees the biggest benefit from this card to the point where you will rarely see him without it. Sabine obviously misses out on the Force User aspect of the card. On top of this, giving a ranged attacker (min. 4 accuracy, max. 11) an extra one die melee attack completely changes how the character would be used just to get value from the upgrade, other than the exhaust for a 1 die reroll. Maul, on the other hand, is already a melee attacker, can self focus before each attack, has an innate +1 damage and surge for a damage token. This means that the attachment’s special action gives him an extra two dice attack with +1 damage, which takes no extra effort to set up, and potential to gain a power token for his second, normal attack. Although slow, he enters the battle precisely when he wants to and makes his rage known on the way out.
Hired Guns: Black Market, Onar Koma, Emperor Palpatine
Self-Preservation/suffer 1 strain/Rush/Tempt (or Force Lightning)
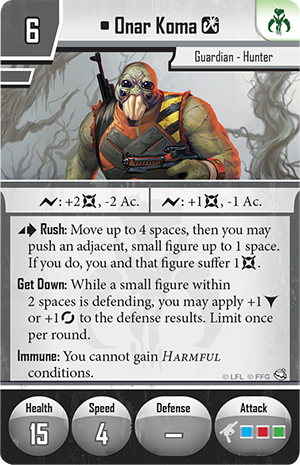

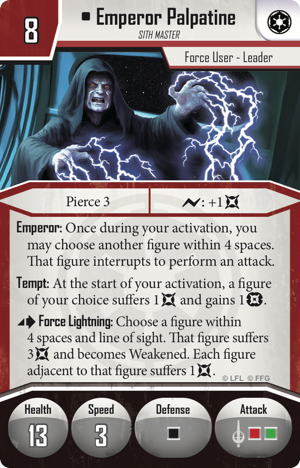
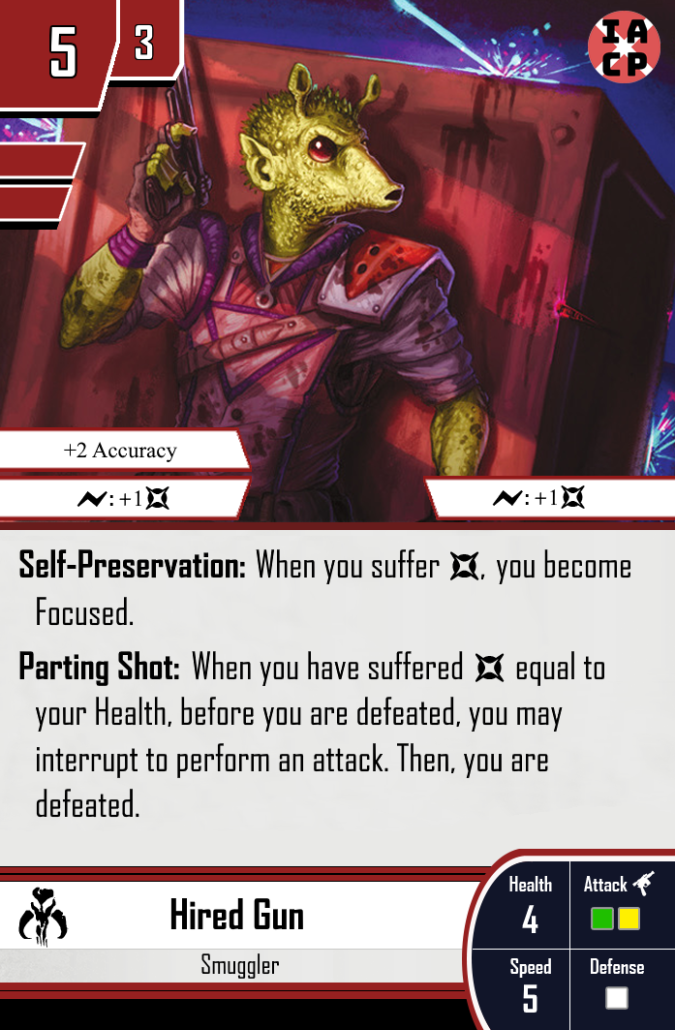
The new and improved Hired Guns are tired of being disposable and now become focused whenever they suffer damage. This means that their Parting Shot is guaranteed to have an extra green die. What has been more interesting is watching the ways players have found to inflict damage on their own Hired Guns to focus them before the battle. The previously mentioned Black Market can put its strain cost to use giving a beneficial condition to one of these smugglers per round. Onar’s Rush can target any small figure, giving them a space of movement plus the damage needed to trigger their ability, however, damaging himself in the process. The cross faction interaction with Emperor Palpatine is arguably most interesting, as Tempt can give the Hired Gun a damage token as well as the focus, while sacrificing a figure to Force Lightning in the middle of your Hired Guns (unofficially referred to as “The Ritual”) can get them all focused. Add some Royal Guards to the situation to potentially focus all 8 figures round one, making the “sacrifice” well worth it.
Bib Fortuna: First Strike
Bartered Information/Victory Points

Bib Fortuna is a great new support character for the Mercenary faction. His Bartered Information ability helps you focus up your army, especially if you have a Victory Point available, allowing two figures to be focused in one action. The main way to have Victory Points available before the fighting starts is by including First Strike in your army. Jabba the Hutt is also usually seen with Bib as his Dirty Dealing does not allow you to include other support figures such as the Rebel Care Package. Jabba can also benefit from these early VPs for his Order Hit ability.
Gaarkhan: Clan of Two
Brutal Cleave/Force Heal

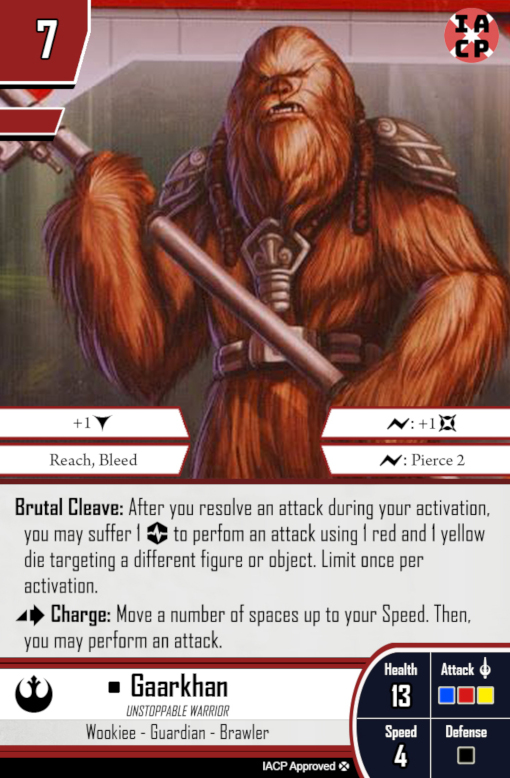
The Child is the most commonly seen companion in the game. Although obviously designed thematically to accompany The Mandalorian, his Force Heal ability pairs particularly well with Gaarkhan. Brutal Cleave allows Gaarkhan to perform a second, slightly weaker attack at the cost of a strain. Being a Brawler, he is also likely to become stunned from using the Parting Blow command card. The Child allows him to take the strain as damage, as Grogu’s Force Heal can recover that damage and simultaneously remove the harmful stun condition, removing the costs of these extra attacks.
Clan of Two: Channel the Force
Cannot suffer damage unless attacked/ choose a Force User to suffer strain

The Clan of Two card also states that The Child cannot suffer damage outside of being attacked. This means he will not suffer damage due to strain and can be chosen by Channel the Force to “suffer the strain” with no actual cost. This is not a pairing that is always seen together, but is a noteworthy interaction.
I hope you enjoyed this article and find it useful as you take your army building “beyond face value”!
Editor: Thanks Dylan for these awesome insights into IACP army list building!